

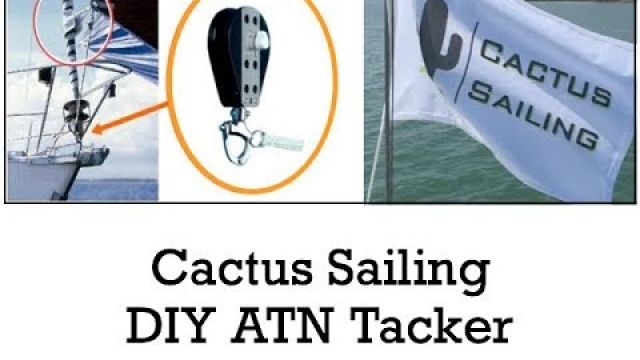
I really wanted an ATN tacker but at £120 I thought it was a little expensive for what basically looks like a lump of plastic with a bit of webbing, nothing ...
Closed Captions (CC):
hello YouTube so today I'm going to show
you how to make an ATM tacker basically
I really wanted one of these for our
cruising shoot to get all the sheets out
of the bush bit but they were around one
hundred and twenty five hundred and
thirty pounds to get delivered to the UK
so and I've also seen some photos of
somebody who would well the photos of an
eighteen tacker that somebody had made
so I thought I'd ever go myself so
that's basically what I'm gonna show you
how to make today and they were flea
cost around 20 quid so a lot cheaper
than actually going to buying her a shot
bought one so today I'm going to be
making an ATM taka I really wanted one
of these and but I just didn't want to
pay the hundred twenty five quid or
whatever they were
so I bought a Fender yes it's a new one
but this was a quid this is a bit of old
ratchet strap I found in the garage
couple of d-rings under snap chuckle
which were battle finder so all in all
I'm hoping to make an ATM taka
best but under 20 quid let's hang and
the only other things you need is a tape
measure and marker pen so what I'm gonna
do is I'm basically to cut the ATN
tucker shape out here was you're gonna
tape rock to the ends and take out this
middle section and then take it down
there so really you could get two out of
that if you really wants to I think this
is probably there's this more decisive
end record
get away with four buddies I didn't want
to use a monkey organ I just want to use
a nice nice wild one so it looks a bit
better and then just got smalls in for
the for the strucken and hopefully we'll
get an ATM tacker out of this I've
measured that I need roughly around 35
centimeters from and to end to go around
the D for sale so that's that's
basically what I'm gonna cut out so I'm
gonna draw around here and then call
that out and I'll show you that in a
second
so there's my cup vendor and that is my
brush pattern to start with and I might
try bit more offer here I basically cut
two lines in here one there I'm on this
side for the webbing to go through it
it's like that so now all I've got to do
is cut these out for the webbing and
then we're pretty much there so all I'm
going to do is just sew down the sides
of this strap in and then just right
next to the d-ring as close as I can get
[Music]
so I'm just going to do some zigzags
down here resolve just to make it bit
the weapon a bit stronger rather than
just some severed lines down the sides
and the edges always seen these webbing
things be a bit a zig zags so I thought
I'll just copy that and then go back up
crisscross it and then it should be
really strong
[Music]
now you can see the excess hopefully
it's just criss-crossed it's really
strong I just need to thread this back
through the defender and so these all
know so that's now threaded through that
all the way around the backside of it
through this bit through the other
d-brane and then I'm just going to sew
this to this and then the double side or
I need around the front really hopefully
today we have a spinnaker
it goes around before say no those get
together with the snap chuckle then that
goes on to the flow of this video
Troy at the time attack
[Music]
you
Cactus Sailing - DIY ATN tacker tutorial for spinnaker / cruising chute
Uploaded by:
Cactus Sailing
•
Category:
Sailing Educational (Sailing Courses)
•
Added on
08 June 2018
Description
I really wanted an ATN tacker but at £120 I thought it was a little expensive for what basically looks like a lump of plastic with a bit of webbing, nothing...
Closed Captions (CC):
hello YouTube so today I'm going to show
you how to make an ATM tacker basically
I really wanted one of...
Closed Captions (CC):
hello YouTube so today I'm going to show
you how to make an ATM tacker basically
I really wanted one of...