

On this week's episode of Onboard Lifestyle we go back in time to show you how we refit our salon and brought our custom 435 catamaran into the new millenium...
Closed Captions (CC):
[Music]
hey guys welcome back to SB basic in the
past we've done a few flashback videos
of our other projects that we have done
prior to starting our vlog so for this
week we're gonna take you back to one of
our first projects which is the salon
seating this is kind of the heart of the
boat with the exception obviously at the
cockpit which I love but when you're
indoors this is where you want to hang
out it's the central location between
the nav station the galley the upper
head and the cockpit so stick around and
we're gonna show you how we built it
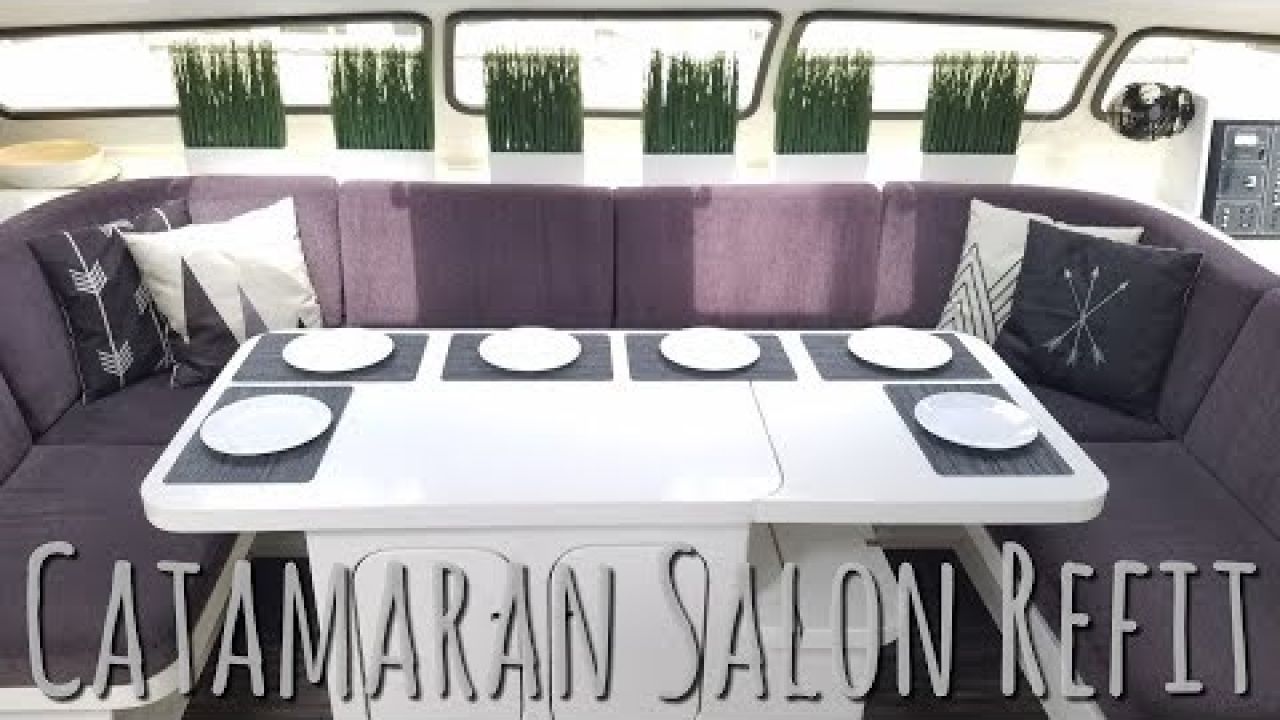
let's start this out by looking at the
salon seating here's what it looks like
2018 but to appreciate this let's
flashback 25 years ago to 1993 and wow
look at the colors this is screaming
Florida in the 90s and it should because
that's where this boat was built and
spent most of its life now let's
flashback eight years ago when we
purchased SV basic very plush but just a
card table so we had a lot of work to do
and what we're gonna do now is show you
the steps that we did to get to this
okay what we had to do first of all was
just cut everything out of here
get all the cushions out took a whole
load out of here and now I could see
really what I had to deal with after
laying it out I figured out quickly that
the layout was not going to work for the
cushions and especially for the back
cushions so I need to extend the decks
out about six inches so frame those in
and just I used actually a clear
vertical grain fir just for its weight
and wrought resistance after I laid that
all out I was able to skin over with a
nine-millimeter ultralight marine grade
poplar ply I put one layer down and was
able to lay out all of the hatches
access to this was important there's a
ton of storage below this then layered
one more layer of nine-millimeter
ultralight on top of that with about an
inch and a half
larger reveal than the original hatch
opening that way I could inset in a
loose door I originally wanted to put
access patches on there and laid it out
for that but I quickly change that and
scrapped that idea and just went with a
nine millimeter flat panel instead just
easier to get into
while it's underneath of a cushion let's
talk a minute about the upholstery
believe it or not this is the only item
on the boat that we subbed out and I am
glad we did this
would have been a pretty difficult
upholstery job if you've never done one
before
we are gonna do some upholstery
ourselves but we weren't gonna start
with this one
so we got some prices here in Seattle
and why were we
sticker shocked on how much it cost here
in Seattle so what we ended up doing was
going about 150 miles out of Seattle
found out retired or semi-retired
upholsterer and he worked with us he was
amazing the only downside was he
couldn't come out to the boat he was in
the middle of the state so I had to
shuttle back and forth templates I was
building templates for the decks
templates for the backs and it took a
while it took about two months to get
this project done but it was well worth
it
well worth the effort for the money we
saved and we are so happy with the
quality so let's take a look at this in
depth and how I did it the lower decks
were actually the easiest part I just
had to pretty much lay out a sheet of
cardboard sketch out and cut out each
individual cushions where I wanted the
the seams to break and number those and
just get him to the upholsterer and he
was able to take those templates and
make the direct patterns off of those
and it came back pretty quickly the
difficult part was the next stage to get
the corner radiuses that was the hard
part so one and then that ended up doing
was I mocked up the two corner radiuses
because they dude leaned back at about 7
degrees
I had to mock him up out of just a thin
sheet of plywood and made a
3-dimensional template just for the two
corners I wanted to start with those I
got those two the upholster and he
mocked up two pieces of foam that
mimicked my templates and I was able to
set those into the corners and Mark out
where he needed to either add or take
off of the foam once we decided that we
were happy with how they sat in there we
got those back to him and he was able to
finish those out along with all the
cushions that lie in between
quite the process but between the
patterns and working with a great guy he
just absolutely nailed it
there are a lot of ways of securing your
cushions and everybody has a preference
there is snaps there's velcro and
fiddles you guys know how I do not like
fiddle so that is not an option on this
boat so velcro I don't like it because
once you tack it in you kind of stuck
with it or you have to peel that off and
sometimes it does peel off the backing
I don't like snaps because I feel like
they just don't secure the cushions
properly so shield I came up with a
design that our upholsterer was really
skeptical about but after he tried it he
actually admitted that it works really
well as long as it's on a painted smooth
surface so what we actually had him do
was so on the backs of all of our
upholstery non-skid liner and the stuff
works great I mean this has been five
six six years and not once has it moved
I mean literally it does it move and we
have it under everything I love it this
works great try it
building this table it was an
interesting process I had this all
designed in my head easily a year or two
before I built it Lin on the other hand
had her own ideas she wanted it open
underneath with pedestals and she felt
like it would be nice and airy and give
you lots of leg room but I wanted to
build cabinets I was building the galley
cabinets at the same time so I thought
it'd be much easier just to do one more
what would be easier but it'd be you
give us more storage so I thought at
that time I was build one more cabinet
and that's what I ended up doing but to
talk her into it I had to convince her
that that extra storage would be helpful
and how I did it as I turned it into a
liquor cabinet
let's take a look at a few of the
features of this now when I design this
I designed this for seating for three or
four with a small coffee table and I did
that for a reason I didn't want to have
the table extend all the way out because
most of the time it's just us three on
board this way you could walk in and out
and and everybody can sit around here
and you could watch a movie
everything's just laid out nicely but
Lynne wanted to have an option to have a
full table when we have guests over I'll
show you that in a minute but let's look
at a few features on this table base now
first feature i'd like to show you is as
you look at it there's a little release
here and the table opens up gives you
nice storage
for some items that you don't use too
often locks out of the way the end
which is I consider it the coffee table
opens up walks out of the way and that's
all the linen storage for the galley
then we have the storage itself let's
take a look at this lots of room for
limbs liquor cabinet well I say Linds
but I do it I can to help her out
deep nice deep pockets for tall bottles
and actually I want to show you guys
these things look at these these are our
wine glasses also you could use these
for your tumblers and our champagne
flutes Covino check them out they're
perfect for a boat they have a little
finger hold
unbreakable hey Louisville now I gotta
pick up my mask people always ask how
long has your dad been working on the
boat and let me tell you it's been a
long time
when I built this cabinet I built it
with the gala cabinets and you could see
how I built those if you go back to
episode 21 I go into detail how I built
those but to recap I used vertical grain
fir and foam overlaid with an ultra
light marine skin then layered it with
three layers of eight ounce cloth and I
did a lot of cloth on this because I
mostly where the cabinet meets the deck
there's one layer up here but there's
two extra layers down here both interior
and exterior of this cabinet and I did
it for a reason I did it because a
cameron's bridge deck in heavy seas is
made to flex and move and it can it
could pound pretty good this cabinets
right in the middle of the bridge deck
so I wanted to make sure it wasn't going
anywhere I'd do a couple tricky little
things to get this to work I'll explain
this hardware when I talk about the leaf
extension but in order to get this table
to fold up if I hinged it here it would
have hit here on the coffee table so I
ended up doing is extending this out
that way when I hinge it it misses
everything
now we're going to talk a little bit
about this table extension and what it
does is turns this table into
comfortable seating for three to four
people into seating for six to seven
people if you want to check out how I
built this go back and look at Emma
sewed 15 it shows me building the leaf
extension and that's the same method I
used to build the table Tom it also
talks a lot about the hardware and how I
install all this and came up with it so
it's an interesting episode and check it
out so let's install this and I'll show
you how it works
I stow the table leaf over here in the
now station there's a good spot out of
the way it doesn't get in my way of my
knees when I'm at the NAP station and
let's face it the table leaves only good
if you have a place to stow it
everything just clicks out of the way
here's the brace I need actually secure
it to the wall with the same fasteners
that I use to hold it to the table
so let's take this off and throw it in
okay everything here is for a reason
here's the strut to hold the table up
these are the fasteners that hold it to
the wall and also hold it to the table
I've made this little bracket here to
hold everything in but I mounted even
where I located this strut is here for a
reason I mounted it here so nobody could
accidentally undo this faster it's
impossible with a strut in place you
can't take this off unless you remove
the strut so you pull the strut out and
snap that release the lead now watch
slides right down and out that easy
and it's not going anywhere I've mounted
little rubber pads so it doesn't scuff
the leaf or the wall it's pretty simple
first thing I do is just stage the leaf
right here here's the strut and there's
six points that it'll touch the table to
keep it nice and strong and I need to
keep it strong because I mean think
about three or four people with dinner
plates their elbows on table playing
cards I don't want the table leaf
falling and it has to can't leave her
out here over two feet so I'll show you
how I do that here's the points I have
one two three four five and six first
thing I do is put the strut in the next
thing I do is just grab the leaf I just
slide it right into position and
underneath I secure
now I just rock the strut up into
position and secure it with the screw
and it's in let's take a look at this
look at much more seating you have quite
a bit it only takes a minute to put in I
made it to put away take a look this is
pretty strong it's not going anywhere
oh and the beauty see the strut right
here out of the way of your knees and
they'll head in it still has access look
at the clearance you still have
plenty of knee room
[Music]
[Music]
now I'm going to put this away in real
time show you how simple it really is
[Music]
[Music]
and that's it done
[Music]
[Music]
hope you guys enjoyed this video it's
always fun to revisit an old project it
really brings back a lot of good
memories huh yep
so if you liked the video remember to
leave a like share and subscribe if you
really liked it and check our patreon
page in the link below
come back next week to see one of our
cool new videos see you then love you
[Music]
[Music]
[Music]
Onboard Lifestyle ep.35 Catamaran Salon Refit
Uploaded by:
Onboard Lifestyle
•
Category:
Boat Building/Maintenance/Repair, Instructional
•
Added on
26 October 2018
Description
On this week's episode of Onboard Lifestyle we go back in time to show you how we refit our salon and brought our custom 435 catamaran into the new millenium...
Closed Captions (CC):
[Music]
hey guys welcome back to SB basic in the
past we've done a few flashback videos
of our other...
Closed Captions (CC):
[Music]
hey guys welcome back to SB basic in the
past we've done a few flashback videos
of our other...